

If you're running your eCommerce business on Shift4Shop, you should seriously consider setting up Google Shopping.
Shopping Ads show potential customers the exact products they are searching for, which makes them very effective. The biggest advantage of Google Shopping over other advertising channels is that they take a lot less work to manage. That’s mainly thanks to Google, which automates a large part of the work involved.
So today, we'll take a look at how to set up Google Shopping on Shift4Shop.
What is Google Shopping?
Google Shopping is a product comparison tool within the Google search engine. This is a paid service that online retailers can use to advertise their products. Their ads will then appear next to their competitors for relevant search queries.
Here is what that looks like on Google:
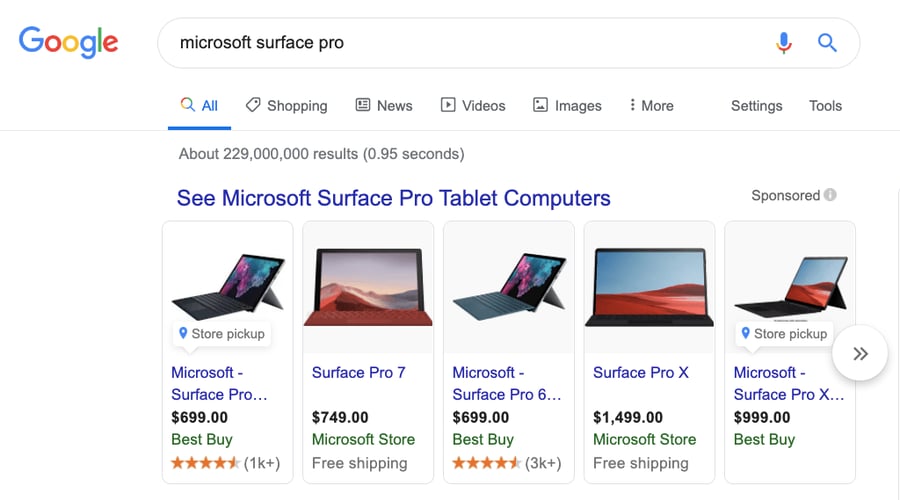
These ads pop up if you search for "microsoft surface pro". They all point to specific product pages from the retailers that are listed in green.
As you can see, each ad consists of a product image, title, price, the name of the store, as well as additional fields showing reviews or promotions.
Compare that to this screenshot of a Search Ad in those same search results:
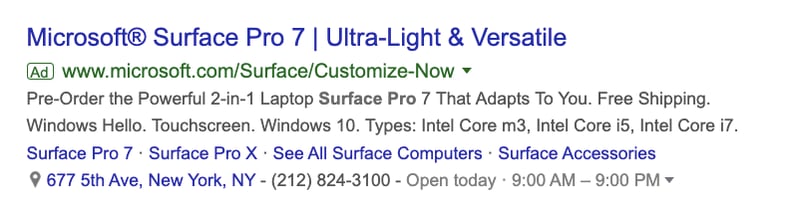
While this isn’t a bad ad, showing the actual products in those first ads is a lot more powerful. This shows why Google Shopping is such an effective advertising channel for eCommerce stores.
Google Shopping Setup
To get started with Google Shopping, you’ll need the following:
- Your Shift4Shop store and products
- A product feed
- A Google Merchant Center (GMC) Account
- A Google Ads Account
If you already have a Shift4Shop store, then #1 should be taken care of. So, in what follows, we’ll cover steps 2-4, turning your store's products into product ads. As I said before, Google automates a large part of the work to create the actual Shopping Ads. But we need to put in some effort to get up to that point.
Let's take an in-depth look at each of the pieces you need to set up your Shopping Ads.
Step 1: Creating Your Product Feed
A product feed is a file that has your product information in a format that Google can understand. You can think of it as a big spreadsheet with the columns containing the different fields, and a specific row for each product.
Besides the information you already have in your Shift4Shop back-end, Google requires some extra details. This can sometimes cause extra problems, as we’ll show you later.
For this guide, we’ll be using Shift4Shop's Google Shopping Feed app that offers automated feed generation and exports all your store’s product data in XML format.
You can optionally create your feed manually by adding everything into a spreadsheet along with your store’s product information. However, this option takes more time than the automated method.
If you want to sell on multiple channels, then you can also check out data feed management tools like GoDataFeed, DataFeedWatch, or Channable.
Using Shift4Shop's Google Shopping Feed App
When you're inside your Shift4Shop store's dashboard, click “Marketing”, then click "Shopping Engines."
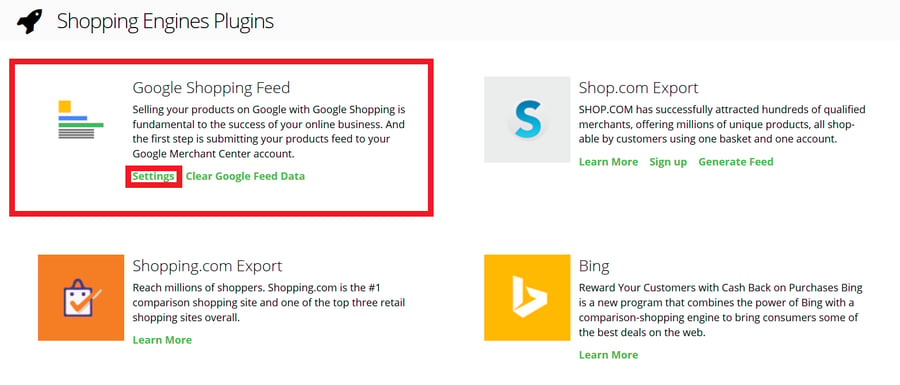
The first thing you'll see on the next page is the "Google Shopping Feed" app. You'll need that to generate your feed, so click the "Settings" button to get started.
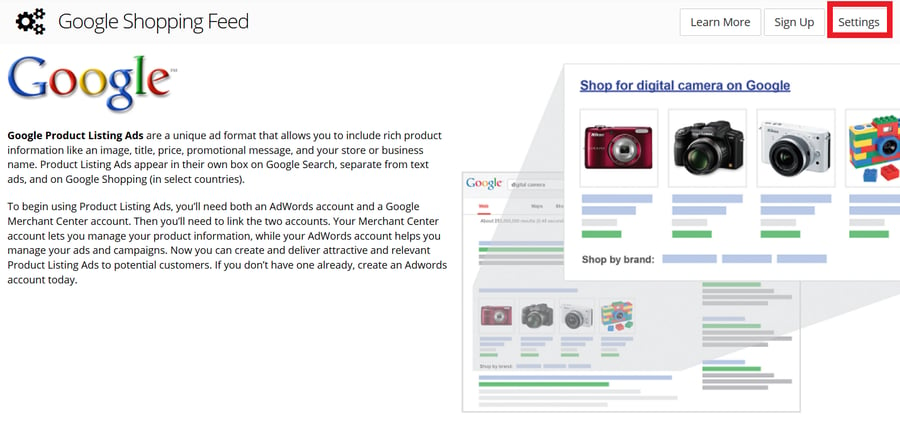
As illustrated in the screenshot above, you'll need to click the "Settings" button again on the next page, which you can find in the top right corner of the page.
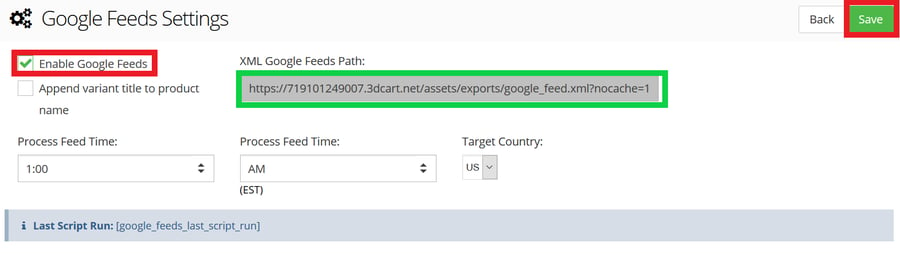
Finally, check the "Enable Google Feeds" box to turn on the app, which will turn your store's products into an XML file (you can access it at the link marked with green on the screenshot) and process it daily at the time you set. You can also set the target country of your Shopping campaigns (you can choose between the US, UK, and Canada).
To learn more about each option, as well as the process and the requirements, I advise you to check out this support article on the Google Shopping Feed app.
After you're ready with your setting tweaks, click "Save".
Pro tip: After hitting "Save", you'll see a "Generate XML File" button in the top right corner. Click it if you don't want to wait until the time scheduled by the app and generate your product feed ASAP.
Step 2: Uploading the Product Feed to Google Merchant Center
For this next step, you’ll need a Google Merchant Center (GMC) account. You’ll use this tool to link the XML files you’ve generated in the previous step to Google’s system.
If you don't have one, you can create one here.
After your Merchant Center account is ready, you have to verify your ownership of your website’s domain.
Submitting Your Product Feed to Google
Now you have to send your product feed to Google by providing the link to the XML file or uploading it manually.
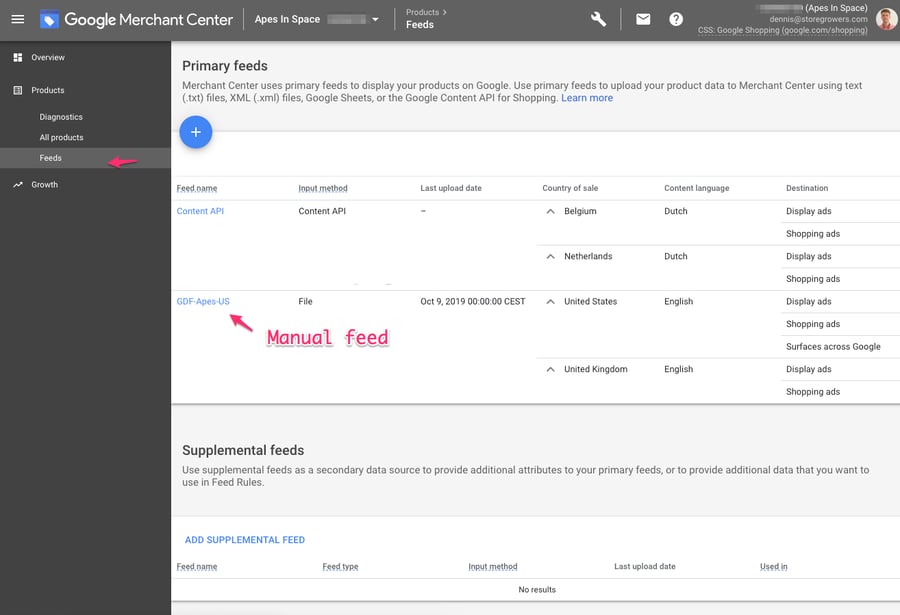
Click the "Products" menu on the left-hand side and head inside "Feeds." Click the blue plus sign to upload your feed (Google will guide you through the process). After you are ready, your “Feeds” menu should look like on the image above.
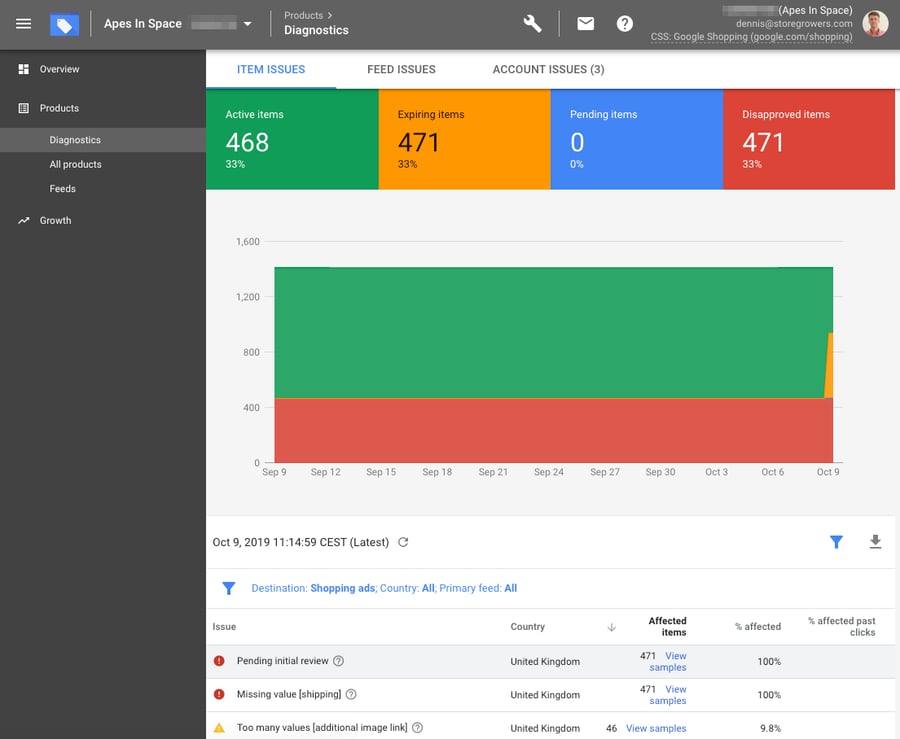
Google will then process your feed and show its health in the Diagnostics report, which you can find in the “Products” tab of your account.
If you see any red or yellow, these indicate errors that need to be fixed before moving on. These errors refer to missing information or product data that’s not in the format that Google requires.
Each store and each product feed are different, so it’s not easy to give generalized advice on how to fix them. I’ve gotten really good at spotting these errors, so be sure to read to the end to grab my checklist to help you fix them!
However you do it, I do recommend you fix these problems, as they can severely limit your visibility, or even lead to an account suspension if they go unaddressed. I also advise you to carefully check out Google's guidelines on product feeds to avoid making (too many) mistakes.
Link Google Merchant Center and Google Ads
After sorting out your product feed, you need to link your Google Merchant Center and Google Ads accounts.
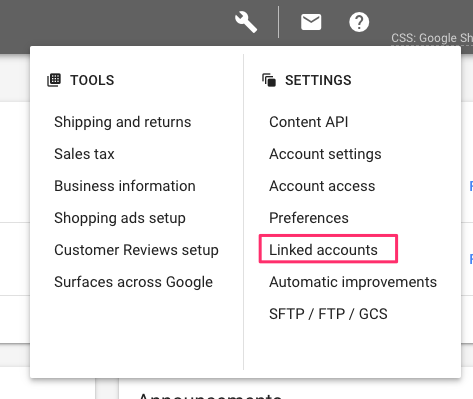
To start, inside your Google Merchant Center account, click the wrench icon and click “Linked Accounts”:
Click “Link Account” and enter your Google Ads customer ID. You can find that in the top bar of your Google Ads account:

This will send you a link request, which you have to approve inside your Google Ads account.
In Google Ads:
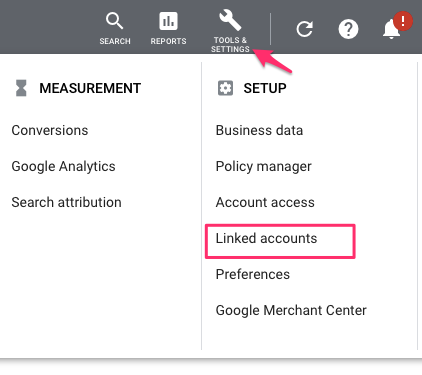
After signing in, find the tools icon in the upper right corner of your dashboard and head inside “Linked Accounts” under “Setup”.
You will find the “Google Merchant Center” menu where you should click “Details.”
Select the GMC account you’ve just sent a link request from (it will show it as “Pending”), then click “View details” in the “Actions” column and the “Approve” button to link the two accounts together.
Configuring Shipping Settings
Next, we need to provide Google with additional details about your business, including shipping and tax information.
We do that in Google Merchant Center. The most important piece of information is your shipping costs. Google uses that in the ads to show any additional costs.
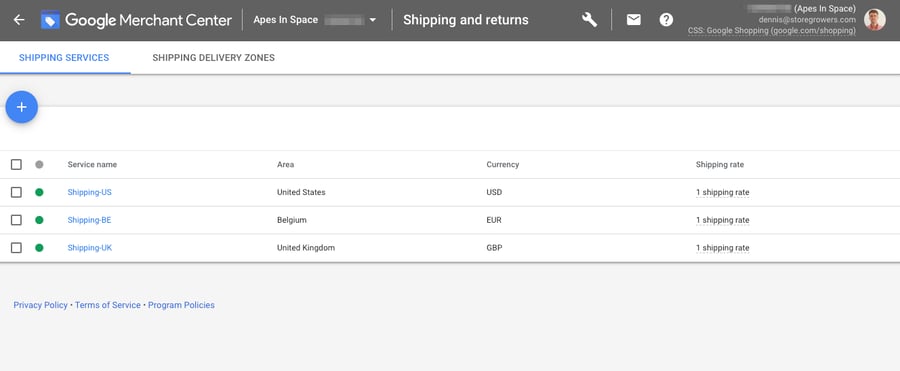
You can configure your shipping settings by clicking the wrench icon and heading inside the "Shipping and returns" menu in the Merchant Center.
When inside, create a new shipping service to provide Google with your shipping prices via the “Shipping and services” tab (by clicking the plus icon).
Pro tip: You can set a flat rate or integrate your shipping rates with different service providers, such as FedEx and UPS.
Configuring Tax Settings (US Only)
If you are selling to customers in the United States, Google also requires you to setup up your sales tax information. If you are not selling inside the US, you can skip this section.

To do that, click the wrench icon and navigate to the "Tax" menu inside Google Merchant Center and configure the cities, counties, and states where you collect sales tax.
Pro tip: Even if you are not selling to the US, I recommend that you check out the local sales tax regulations in your target countries.
Step 3: Creating a Google Shopping Campaign
Now we’re finally ready to create a Google Shopping campaign inside of Google Ads.
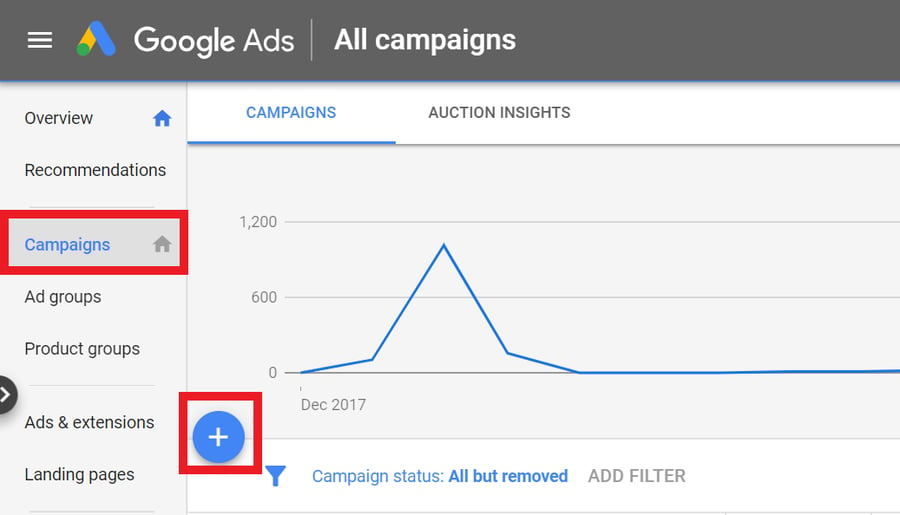
After you have your Google Ads account ready, go to the "Campaigns" menu and click the plus sign to create a new Shopping campaign.
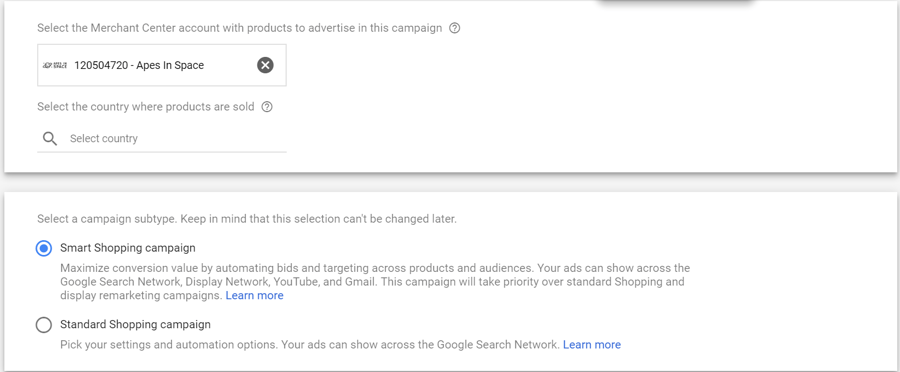
On the next screen, Google offers you two options for your campaign: Standard Shopping and Smart Shopping.
Smart Shopping campaigns use automated bidding and have more reach as they also show your ads beyond the Google Search results. They can also appear on the Display Network, YouTube or even Gmail. The downside of using a Smart Shopping campaign is the limited visibility and control of where your ads appear. That means you can’t figure out what’s working and what’s not.
In this guide, I'll use Standard Shopping campaigns as this campaign type gives you a lot more control.
So, after selecting your preferred Shopping campaign type, configure your settings (such as bidding, budget, targeting, etc.) on the next screen to finish creating your campaign.
I recommend starting out with a low budget. A starting budget of $10/day will already give you a lot of data, which you can use to see and optimize the performance of your Shopping campaigns. You can also keep your bids low to conserve budget, using Manual CPC as your bid strategy.
Creating Shopping Ad Groups
Next, you need to create ad groups for your Shopping campaign.
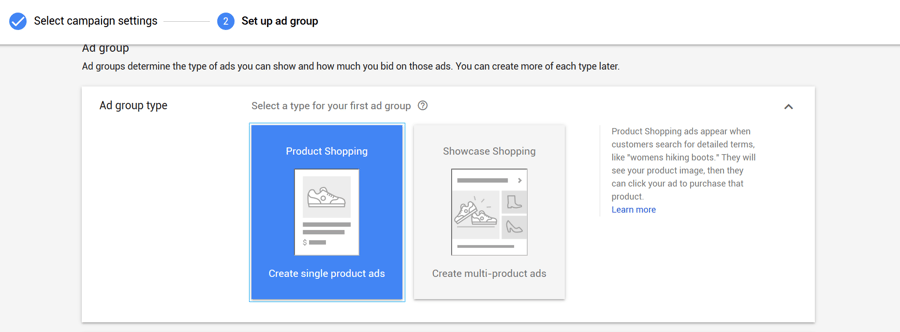
You can choose to either use Product Shopping or Showcase Shopping ad groups. Let me explain the main difference between the two ad group types very briefly.
Product Shopping ads are the most commonly used ad groups for Google Shopping. If you choose this ad group type, Google will automatically create your ads, showing product ads with an image, title, price, and store name for each product. These ad groups show up most for very specific search terms like "ray ban wayfarer".
On the other hand, Showcase Shopping ads are a newer ad format that shows up for more generic search terms such as "sunglasses", for which they display a selection of relevant products from different retailers.
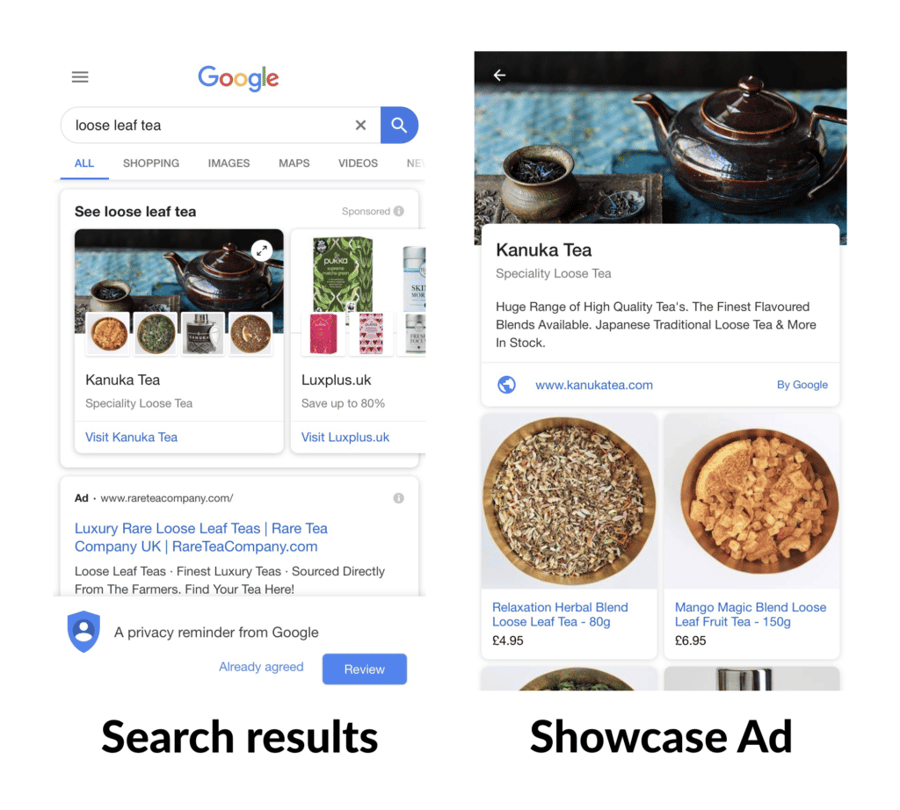
They are available for mobile and desktop, but you’ll mostly find them on mobile. Showcase Shopping ads show an image with multiple products, a title, the store's name, and a link to its website in the initial view with additional content (e.g., branding image) displayed when a user expands the ad. The downside of these Showcase ads is that they require more work as you have to create ads for each of your ad groups.
In what follows, I'll use Product Shopping ads for this tutorial.
After choosing your preferred ad group type, play with additional settings on the next page, and click "Finish" to complete your Shopping campaign setup.
If you've followed all of the above, you can launch your first campaign! This is a great start, but there is plenty more you can do, which is what we’ll look at next.
Step 4: Optimize Your Google Shopping Campaign
In this final section, I'll show you the different ways you can improve the performance of your Google Shopping campaigns.
Campaign Structure
One of the most effective ways to improve your Google Shopping campaigns is by working on your campaign structure.
If you've followed my setup guide, your campaign structure should like the following:
- One Google Shopping campaign
- One ad group
- One product group
This is a decent structure to start with, but once you have more click data, you can use that to increase your control over your ads. The best way to do this is to create new product groups using product attributes (like the brand) to control the maximum cost per click you set for each of your products or brands.
You can also use product attributes to split up new Shopping campaigns via inventory filters.
Another very effective approach is Search Query Level Bidding, a strategy that allows you to target specific search terms with Google Shopping by running multiple campaigns that contain the same products.
Negative Keywords
Another way to improve the performance of your Shopping campaigns by eliminating low-quality and irrelevant traffic. You can do this by adding negative keywords to your account. That prevents your ads from showing up these keywords.
The easiest way to find which negative keywords to add is to look in the Search Terms Report. That shows you the actual things people have searched for before they clicked on your ads.
For example, if you sell a t-shirt with an apple on it, you should eliminate all search queries that are related to Apple, to avoid wasting money on searches for Apple products.
Product Feed
The product feed serves as the base for your Shopping campaigns by providing Google all the information it needs about your store's products.
So, it's crucial to regularly optimize your feed to boost the performance of your Google Shopping Ads.
Check out the following table to get an insight into the different ways you can improve the performance of your product feed:
|
|
Optimization Method |
Result |
|
Product titles |
Include the most popular product-related search terms into your product titles, keep your titles concise, and cover the most valuable keywords first. |
Traffic increase |
|
Product prices |
Collect the products with the lowest metrics, analyze whether you can remain profitable at a lower price. If yes, decrease their price. Do the same with shipping costs (especially when you can't lower product prices). |
Increase in CTRs and conversion rate |
|
Product images |
Enhance product images to make them clear and simple, use creative tricks (e.g., flipping a product) to stand out from your competitors. |
Increase CTRs |
Bidding
As each click on your Shopping ads costs you money, you have to ensure that you remain profitable.
However, optimizing your bids is a tough job. If you pay a high cost per click for your ads, your profit margin will be smaller. On the other hand, if you bid too low, you risk starving your account for traffic.
Therefore, you have to find the perfect balance between remaining profitable and getting a decent amount of traffic for your products.
The best way to nail this is to start small with very low bids so you can experiment with CPCs while limiting the risk of losing (much) money. With a quality-first mindset, experiment with your Shopping bids until you get decent conversion rates, CTRs, and profit margins as well as low bounce rates for your product ads.
If you level up the quality of your traffic, you can then scale your Shopping campaigns by gradually increasing your bids.
You can optionally use automated bidding strategies that use machine learning to automatically set bids for your Shopping campaigns based on your goals.
The most popular automated strategies for Google Shopping include:
- Enhanced Cost-Per-Click (eCPC): ECPC adjusts your manual CPCs by predicting the likelihood of the clicks with the goal of increasing your conversions.
- Maximize Clicks: Adjust your bids to get an increased number of clicks on your ads.
- Target Return on Ad Spend (Target ROAS): Based on your desired target ROAS, the goal of this bid strategy is to maximize your conversion value.
Pro tip: I recommend starting out with Manual CPC and use it as a baseline when you experiment with automated bid strategies to compare the results. If you decide to go automated, I recommend starting with ECPC.
Acing Google Shopping With Shift4Shop
I hope this article has helped you in getting started with Google Shopping for your Shift4Shop store.
Once you manage to get your product feed into Google Merchant Center, you should be able to launch your first Google Shopping campaigns.
As promised, I’ve also put together a handy checklist that will further guide you through every part of the setup process.


Leave a reply or comment below